
Packing a suit in a carry-on is one of those “simple in theory, messy in reality” travel skills. You’re trying to protect structured shoulders, keep sharp creases where they belong, avoid shiny pressure marks, and still fit shoes, tech, and a day’s worth of meetings into one bag.
The good news: you don’t need a garment bag the size of a small canoe. With the right folding method, smart layering, and a quick “arrival routine,” you can step off a plane and look like you didn’t just spend six hours folded into seat 14B.
If you’re creating a repeatable system, start with the bag: a business-ready carry-on with a flat packing area and good compression straps makes everything easier (this one is designed for that purpose).
Check a Business-Friendly Carry-OnAffiliate Disclaimer: TravelForBusiness.org participates in affiliate programs, including Amazon Associates, and may earn a commission from qualifying purchases at no extra cost to you.
Quick answer: the no-wrinkle suit packing system (5 minutes)
Here’s the fastest, most reliable process (details + variations below):
- Start with a freshly pressed suit (or at least fully cooled after ironing/steaming).
- Fold the jacket using the “inside-out shoulder” method (which protects the structure and lapels).
- Fold trousers along the existing crease and add a “buffer layer” (tissue or tee).
- Place the suit on top of, or just under, a soft topper layer; never at the bottom.
- Use gentle compression (snug, not tight) to prevent shifting.
- On arrival: hang immediately, and use a steam shower to erase travel lines.
If you only remember one rule: wrinkles are caused by pressure, movement, and time. You’re reducing all three.
Essential tips (the basics that prevent 90% of wrinkles)
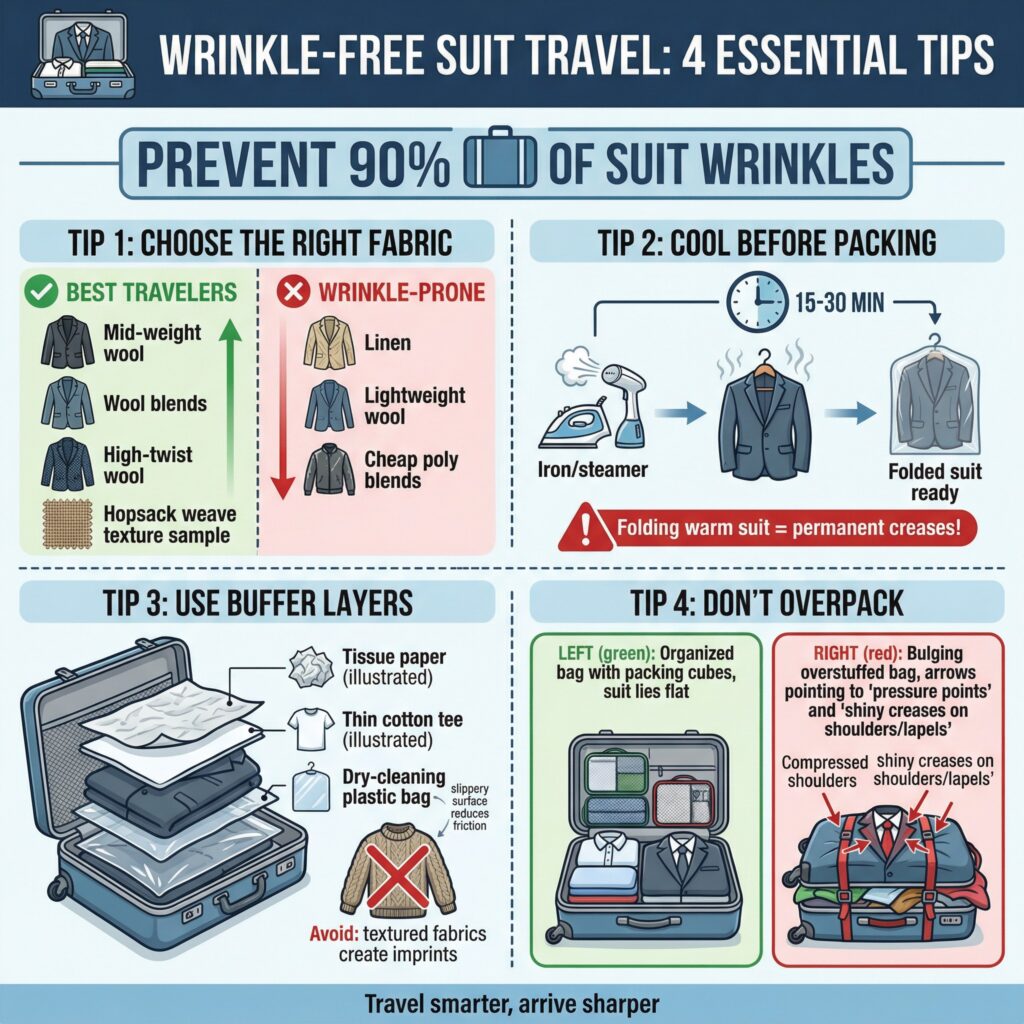
Choose the right suit fabric for travel
Not all suits travel equally.
- Best travelers: mid-weight wool, wool blends, high-twist wool, hopsack/weave textures
- Wrinkle-prone: linen, very lightweight wool, cheap poly blends that “memory crease”
- Business hack: if you travel constantly, consider a “travel suit” or a blazer-and-separate-trousers approach (more forgiving).
Pack a suit that’s clean, pressed, and fully cooled
This sounds obvious, but it’s a top mistake: people steam/iron, then fold immediately.
- After steaming/ironing, hang it for at least 15–30 minutes until fully cool and dry.
- If you fold a warm suit, you “set” creases in the wrong places.
Use a buffer layer (it matters more than you think)
Buffer layers reduce friction and pressure lines.
Good options:
- tissue paper
- a thin cotton tee
- a dry-cleaning plastic bag (the slippery surface helps)
Avoid thick sweaters or textured fabrics directly against the suit—those can imprint patterns.
Don’t overpack your carry-on
Overstuffing creates tight pressure points that turn into shiny lines on wool (especially on the shoulders and lapels). If the bag is bulging, your suit is already losing.
If you need to compress your other clothing, use cubes to keep everything stable so it doesn’t shift into the suit.
Grab Packing Cubes for Cleaner LayersEssential method: fold the suit jacket the “right” way
Jacket folding method: inside-out shoulders (best all-around)
This is the go-to method for carry-ons because it protects the structure and avoids a harsh center fold.
Step-by-step:
- Empty all pockets. (Cards/keys create pressure dents.)
- Hold the jacket upright with the front facing you.
- Turn one shoulder inside out (like you’re partially reversing the sleeve/shoulder area).
- Tuck the other shoulder into the inside-out shoulder.
The jacket now “nests” into itself, lining-to-lining. - Smooth the lapels and chest—don’t rush this part.
- Fold once horizontally (bottom-up toward the collar), depending on the suitcase’s size.
Why it works: shoulders are protected, lapels lie flatter, and the fold lines land in less visible zones.
Pants folding method: follow the existing crease
Step-by-step:
- Lay trousers flat and align seams.
- Fold in half along the crease (don’t invent a new crease).
- Add a buffer layer at the fold point (tissue/tee).
- Fold again only if needed to fit the bag size.
Pro tip: If you’re packing two suits, put trousers in the middle as a “soft shield” between jackets.
Packing order inside the carry-on (this is where people mess up)
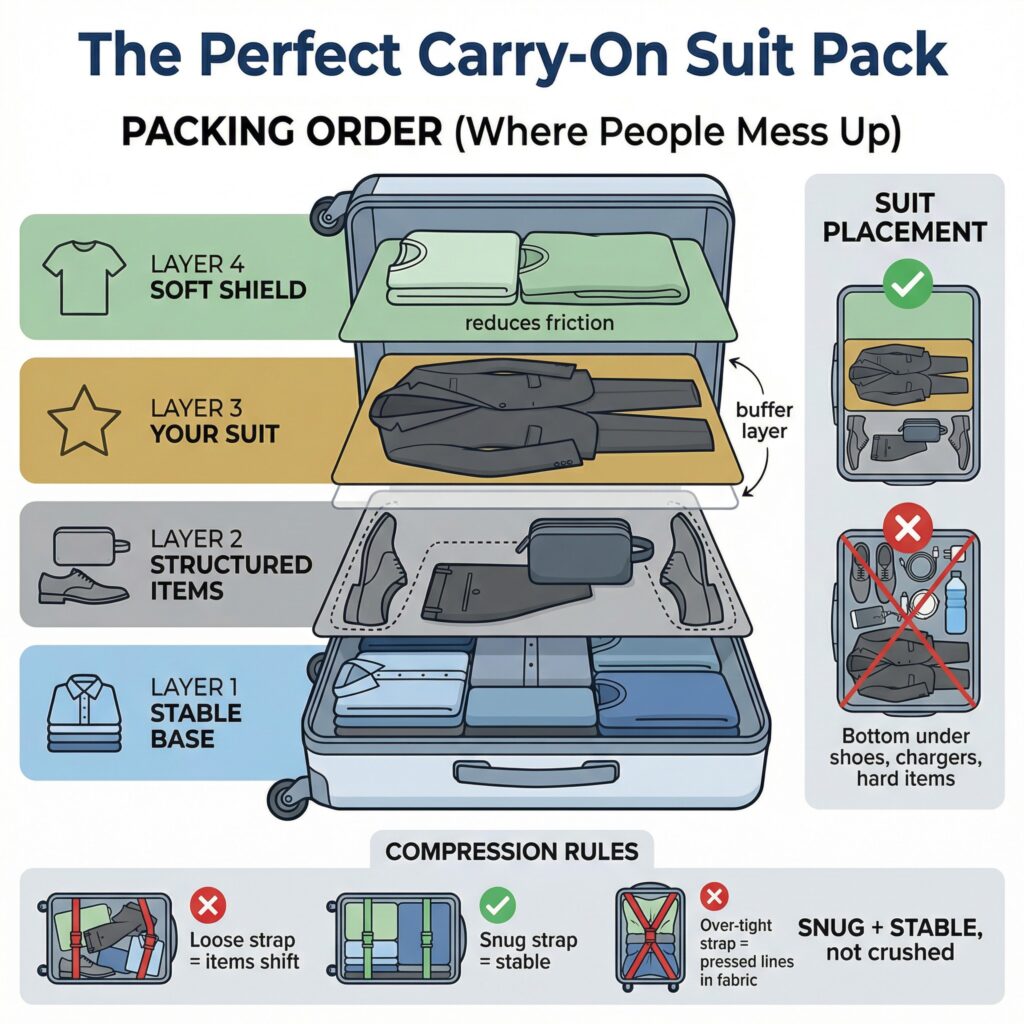
The ideal layering stack
Your goal is a flat, stable base with the suit near the top.
- Bottom layer (stable + flat): folded casual shirts, base layers, or a thin sweater
- Middle layer (structured items): shoes (in bags) placed heel-to-toe along edges, toiletries pouch tucked into corners
- Suit layer: jacket + trousers (buffered), laid as flat as possible
- Topper layer (soft shield): a tee or thin knit to reduce friction when closing the bag
Where the suit should sit
- Best: top layer or just beneath a soft topper
- Worst: bottom under shoes, chargers, toiletry kits, or hard corners
Use compression carefully
Compression should stop shifting, not crush fabric.
- Tight compression straps can create hard lines across wool.
- Aim for “snug + stable.” If the suit looks “pressed into” a strap, loosen it.
Advanced strategies (for frequent flyers and longer trips)
Strategy 1: The “bundle wrap” upgrade (lowest-wrinkle for full outfits)
Bundle wrapping means you wrap your suit around softer items so it never takes a sharp fold.
How to do it quickly:
- Build a soft core (tees, underwear, knit, pajamas).
- Lay trousers flat, wrap around the core.
- Lay the jacket (nested method) around the trousers/core.
- Place the bundle near the top of the case.
This is excellent when you’re packing one suit + one extra outfit and want near-garment-bag results.
Strategy 2: Use a garment folder (if you wear suits weekly)
If you travel with suits constantly, a garment folder (tri-fold with wings) can be a game-changer because it creates wide, gentle folds and keeps everything flat. If you don’t already have one, search for a “garment folder for suits” on Amazon and attach your affiliate link.
Strategy 3: Choose the right suitcase style
Some carry-ons simply pack suits better:
- Front-opening business carry-ons can keep suits flatter.
- Spinners with a full clamshell give more usable flat space.
- Ultra-soft duffels can cause bunching unless you use a folder.
If you want a premium “business travel” case that’s built to handle structured clothing, this is a strong option.
See Travelpro Platinum Elite Carry-OnFor lightweight trips (especially if you’re walking through airports or hopping trains), going lighter reduces overstuffing and pressure wrinkles.
Check Travelpro Maxlite 5 Carry-OnStrategy 4: Pack the suit last, unpack it first
Wrinkles aren’t just about the fold. It’s also time under pressure.
- Pack the suit right before you leave
- On arrival, unpack and hang it immediately
If your suit sits compressed for 36 hours, you’ll fight it later.
Common pitfalls (and how to avoid them)
Pitfall 1: Folding a suit that isn’t fully dry/cool
Result: set-in creases and weird shine marks.
Fix: cool-down time on a hanger before packing.
Pitfall 2: Stuffing pockets “because it’s convenient”
Result: pockets that bulge and press into the fabric.
Fix: pockets empty, small items in a tech pouch.
Pitfall 3: Placing the suit against shoes or toiletry kits
Result: pressure dents + odor risk.
Fix: shoes in bags along edges, suit above them, soft topper layer.
Pitfall 4: Over-tight compression straps
Result: hard horizontal lines across jacket or trousers.
Fix: snug only; strap should stabilize, not crush.
Pitfall 5: Leaving the suit packed until right before the meeting
Result: you’ll be “steam panicking” 10 minutes before the elevator.
Fix: arrival routine (below).
Expert advice: the 10-minute arrival routine (saves you every time)
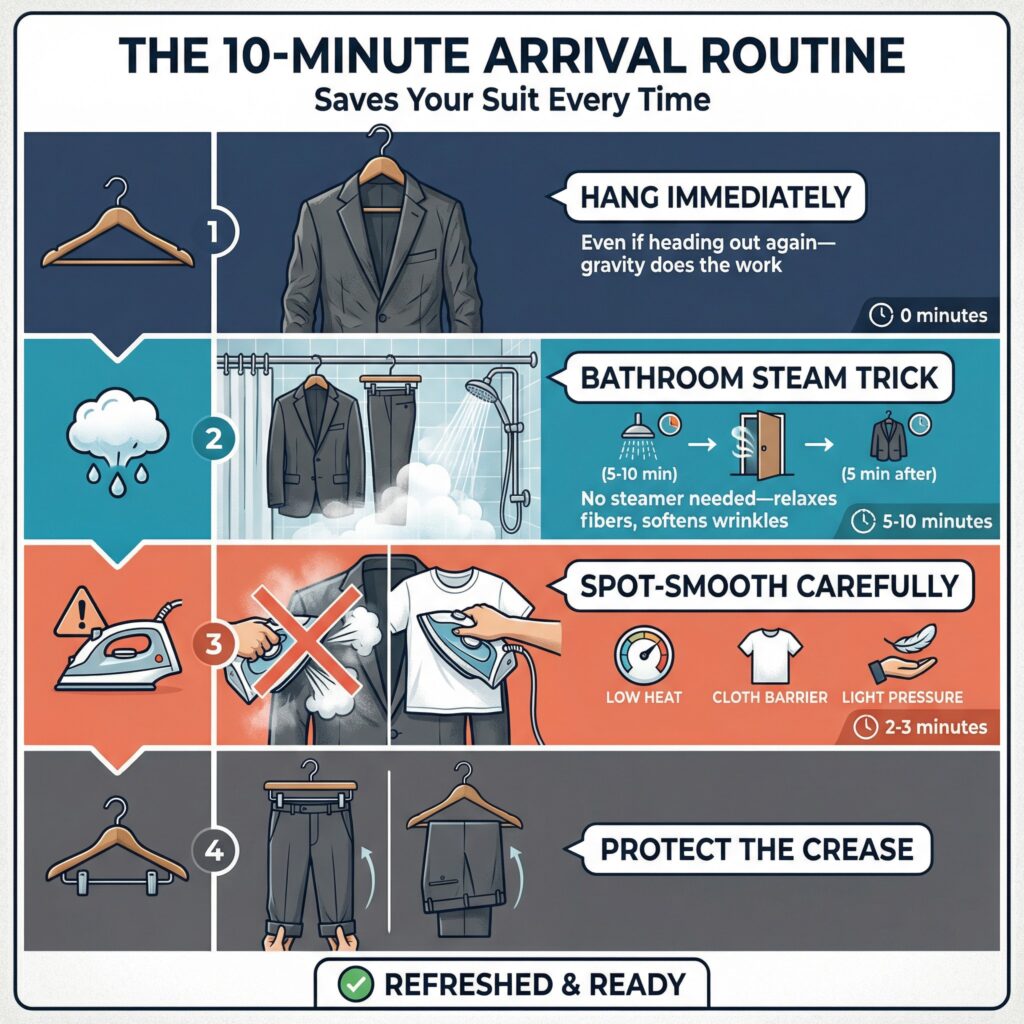
Step 1: Hang the suit immediately
Even if you’re heading out again—hang it first. Gravity does a lot.
Step 2: Use the bathroom steam trick (no steamer needed)
- Hang the suit in the bathroom (not inside the shower stream).
- Run a hot shower for 5–10 minutes with the door closed.
- Let it hang another 5 minutes afterward.
This relaxes fibers enough to soften most travel wrinkles.
Step 3: Spot-smooth with your hands (don’t over-iron)
If the hotel iron is aggressive, you can create shine marks. If you must iron:
- use a lower heat
- iron through a thin cloth (like a clean cotton tee)
- avoid pressing hard on lapels
Step 4: Protect the crease (pants)
Hang trousers by the cuffs or use the hotel clip hanger. If you fold along the existing crease, it will usually “come back” once hanging.
What to do if you still get wrinkles (quick fixes)
If you arrive and see stubborn wrinkles:
- Lapels/chest: smooth with hands, steam-shower trick, or light steam from a distance
- Sleeves: hang and let gravity pull; minor wrinkles usually drop out in 30–60 minutes
- Pant knees: hang + gentle steam, then let them rest
If your schedule is brutal (land → taxi → meeting), consider packing a backup option: a wrinkle-resistant blazer or a knit jacket that still looks professional.
Conclusion
A suit can absolutely survive carry-on-only travel—if you pack it like a structured garment, not just “another shirt.” Focus on three things: smart folds, stable layering, and quick de-wrinkling on arrival. Do that, and you’ll walk into meetings looking sharp even on back-to-back travel days.
And the easiest upgrade you can make is still the same one: pack in a carry-on that stays flat, doesn’t bulge, and doesn’t force your suit to take the brunt of compression.
(And yes—this method works even if you’re learning how to pack a suit in a carry-on for the first time.)
FAQ: Packing a Suit in a Carry-On Without Wrinkles
1) What’s the best way to fold a suit jacket for a carry-on?
The inside-out shoulder fold, which involves turning one shoulder inside out, tucking the other shoulder into it, smoothing the lapels, and then folding once horizontally if necessary, is the most dependable technique. It prevents harsh center creases and safeguards the structure.
2) Should I pack my suit at the top or bottom of the carry-on?
Near the top. Put the suit on top or just under a soft “topper” layer (like a tee). Packing it at the bottom, under shoes, toiletries, or tech, creates pressure points that cause wrinkles and shiny marks.
3) Is a garment folder worth it for business travel?
If you fly with a suit more than a few times per month, yes. A garment folder creates wider, gentler folds and keeps the suit flat. If you only pack a suit occasionally, the inside-out shoulder method and smart layering are usually enough.
4) What’s the fastest way to de-wrinkle a suit in a hotel without a steamer?
Hang the suit immediately, then use the steam-shower trick: hang it in the bathroom (away from direct water), run a hot shower for 5–10 minutes with the door closed, and let it hang for another 5 minutes.
5) Can I pack two suits in one carry-on without wrecking them?
Yes—if you keep everything flat and stable. Nest each jacket (inside-out shoulder method), fold the trousers along the existing crease, and use the trousers or a soft layer as a buffer between jackets. The key is not overstuffing the bag so the suits aren’t crushed.